
Table of contents
How the actual build look like.
TL;DR Link to heading
This is not a guide on how-to install and configure Linux, but a list of the components I used to build my personal Linux workstation, to avoid any compatibility issue and to exploit the best in terms of performance and stability. For who’s asking, I am using Arch Linux as my daily driver and it is configured through the Ansible playbook i made.
2026 Updates Link to heading
AM5 is still going strong, so I stayed on the platform and did a bigger upgrade this time: new CPU, a dedicated GPU, and a new power supply to handle the extra load.
| Component | Model | Amazon IT | Amazon US |
|---|---|---|---|
| CPU | AMD Ryzen 9 9950X | amazon.it | amazon.com |
| GPU | ASUS DUAL Radeon RX 7900XTX OC Edition, 24GB GDDR6 | amazon.it | amazon.com |
| Power Supply | CORSAIR RM850e (2025) 850W Fully Modular | amazon.it | amazon.com |
The 9950X jumps from 12 to 16 cores with better single-thread performance. The main addition is the RX 7900XTX: 24GB of GDDR6, big cooler, and very quiet. The Corsair PSU replaces the EVGA to keep up with the higher power draw.

The build in 2026, featuring the ASUS Radeon RX 7900XTX
The main reason I added a dedicated GPU is local AI. With 24GB of VRAM and ROCm working well on Linux, I have been running large language models locally for a while now. A dedicated post is coming soon on my full setup: models, configuration on Arch, and why it is worth it.
2024 Updates Link to heading
This year I did 2 small upgrades to the build:
| Component | Model | Amazon |
|---|---|---|
| RAM | Crucial Pro 96GB DDR5 RAM Kit (2x48GB) 5600MHz | https://amzn.to/4fAwhrd |
| NVMe | SAMSUNG Memorie 990 PRO M.2 2TB | https://amzn.to/41Rfahx |
Introduction Link to heading
The last time I built (assembled) a PC, there still were IDE ribbon cables, the CPU didn’t strictly require a cooler, and 3Dfx was the best in class GPU you can have, floppy disk reader to boot OS (years later, BIOS became smarter enough to boot from USB or CD-ROM), no LED or other fancy stuff on the case, just a metal and cheap plastic white case with some activity led for the spinning drives and sometimes, the luckiest ones, the mythical turbo button (well to be honest the turbo button disappeared after 486 CPUs).
They were enjoyable days; Amazon or such wasn’t a thing; to buy components, you should physically go to local computer stores; the primary source of information to choose the best product were PC magazines, weekly or monthly, released on the newsstand.
What do I remember most of that days as a PC enthusiast? Three things:
- Pentium 90 with MMX extensions - the first ever X86 multimedia extensions baked into a CPU, they could add a considerable amount of FPS. Still, of course, they required new games or substantial patches, and it was very hard at the beginning to find MMX-supported games or applications, so it was quite a disappointment.
- The first 3Dfx card with bilinear filtering in action - this kind of technology changed everything; it was like having an arcade at home; everything was so smooth, fast, and sharp as never before; this was the beginning of a new era of gaming and the fast decline of arcades.
- LINUX - Still vivid memories of Installing Debian for the first time with dselect, apt-get was not yet invented, and how easy it was to finish in the land of Dependency Hell. Still, when you finally succeeded, it was mind-blowing; running in your computer a real UNIX-like system for free and having the opportunity to assemble your operating system from the ground up and making your hand dirty with terminals and stuff was very fun, and still, it is.
AI GENERATED
If you want to experience some nostalgia for the 90s hacker culture, you can watch the following movies:
- Hackers (1995)
- Sneakers (1992)
- The Net (1995)
- WarGames (1983)
These movies may not be the most accurate representation of hacking, but they capture the era’s spirit and can be pretty entertaining to watch.
Fast forward to nowadays and why I have chosen to assemble a PC again.
The idea was quite simple, as the work today is almost totally done at home; why be limited by using just a laptop, which is very limited in terms of computing power and expandability, when I could have run something powerful capable of making me run several browsers, containers, runtimes, and Kubernetes clusters without sacrificing performance and let me free to choose and upgrade components, the best in class for Linux compatibility.
And last but not least, I was so curious to dive deep into the modern PC building ecosystem and to get my hands dirty again.
So once the idea became a bit more solid and even thanks to some new coming projects (the best excuse ever 😎), I started to write down the workstation requirements.
Requirements Link to heading
- First and foremost, everything must run natively on Linux as a first-class citizen, and even better if the vendor supports everything baked into the Kernel.
- Air or liquid cooling, ultra-silent and power efficient.
- Integrated GPU as I don’t run games but still something powerful enough to accelerate video and desktop stuff and to drive one or multiple external 4K monitors.
- A platform still supported for at least the next 3 years to let me upgrade parts such as RAM and CPU without changing everything.
- Capable of supporting at least 128GB of ECC RAM
- At least 2 NVMe PCIe 4.0 slots and a bunch of high-speed SATA ports.
- A solid, professional-looking ATX case with plenty of room to do nice and clean cable management.
- 💰 Budget ~1500€
Software Link to heading
Regarding the operating system, it has been over 3 years since I’ve been in love with Arch Linux, after many years of Debian-based distributions like Ubuntu or generally no rolling release distributions.
Arch Linux is a “lightweight and flexible Linux distribution that tries to keep it simple.”
Why did I make this switch? That is a very good question! There are several reasons:
- Things in hardware and OSS are moving fast, LTS distributions tend to age very quickly, like Kernel, media subsystems, or Desktop Environments, with a rolling release distribution you have always the most updated software or kernel, this means better hardware support and new features.
- Rolling release does not mean instability by design, as many could think, it is more having always the latest stable versions, this accelerate 3 factors: new features, deprecation and removals, you should just know this.
- Archlinux Wiki is the greatest piece of documentation ever written by a community
- AUR with all its defects it is the best and usable (PPA i am looking at you, yes) which is a community-driven repository of software packages that are not available in the official repositories, you can find packaged basically everything.
- I can build a system exactly with the components i need, the distribution doesn’t come with an opinionated installation set of packages.
I used the Arch Linux Ansible Provisioner that I wrote to automate the installation and configuration. This tool automates the entire process, from partitioning the disk to installing the necessary packages and configuring the system. It also installs and configures my preferred desktop environment, which is now the Sway window manager, Wayland rocks.
To bootstrap this system i didn’t reinstalled from scratch, i’ve cloned another NVMe disk with Clonezilla even capable to work with encrypted disks and then enlarged the filesystem to fit the new 1TB size, that’s it, everything worked out of the box.
Some system data:
| |
Hardware Link to heading
First, I will provide the parts, and then I’ll provide the rationale for each.
| Component | Model | Amazon |
|---|---|---|
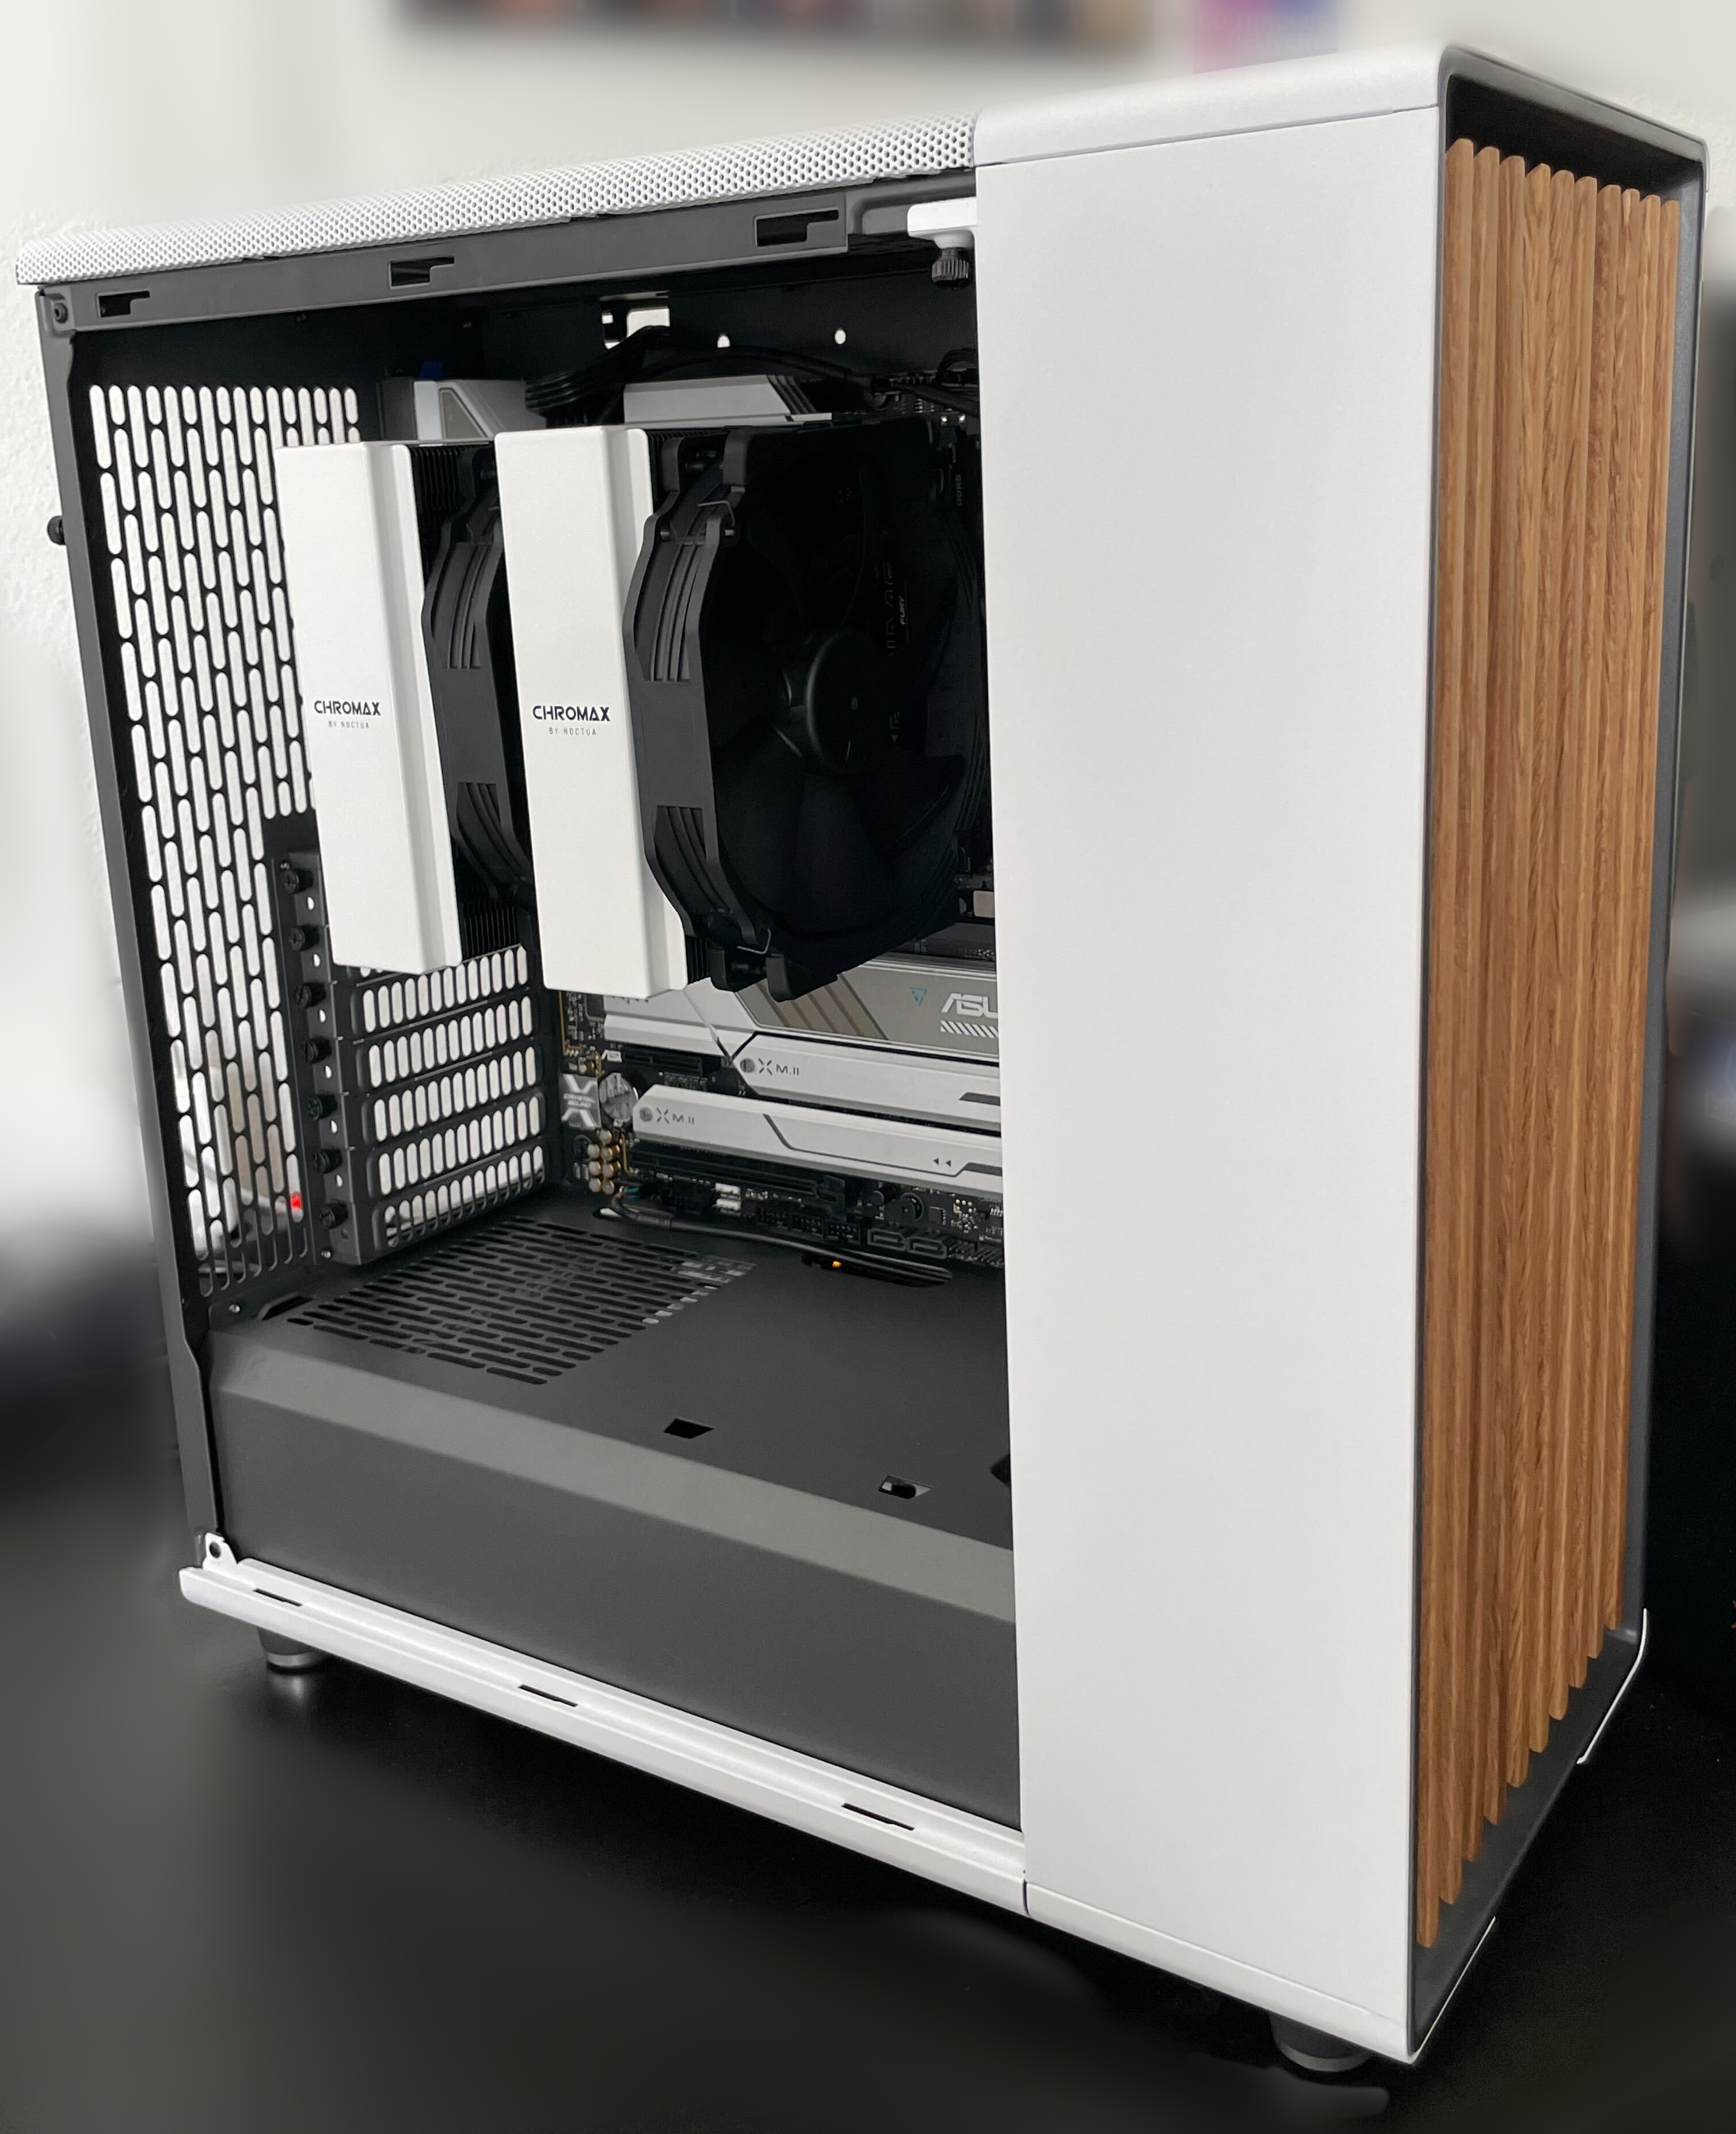
| Case | Fractal Design North White | https://amzn.to/4fEfdkj |
| Motherboard | ASUS PRIME X670E-PRO WIFI | https://amzn.to/4fC3FOf |
| CPU | AMD Ryzen 9 7900X | https://amzn.to/3DALgUL |
| Cooler | Noctua NH-D15 chromax.Black | https://amzn.to/3Dt0iMb |
| Cooler white cover | Noctua NA-HC4 chromax.white hatsink cover | https://amzn.to/4gRjvpk |
| RAM | Kingston Technology Fury Beast 32GB (2x32GB) 6000MT/s DDR5 CL36 | https://amzn.to/3Phvhh1 |
| NVMe | Samsung 980 PRO 1TB | https://amzn.to/3PixRn4 |
| Power Supply | EVGA Supernova 650 G7 Platinum 650W | https://amzn.to/3DvBLX4 |
| Cable mod | CableMod Pro ModMesh Sleeved Cable Extension Kit (White) | https://amzn.to/49YRM3C |
| Thermal paste | ARCTIC MX-4 | https://amzn.to/4gy28u1 |
Platform Link to heading
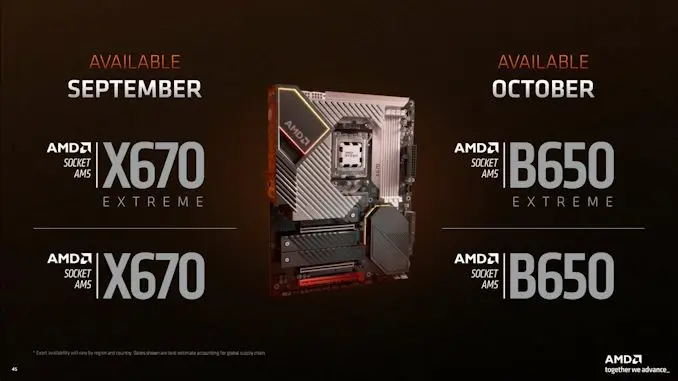
Given this list of requirements, the final choice was to go all-in on the new AMD AM5 platform with Zen4 CPU architecture, which satisfies most requirements.
Here is the launch presentation of the new platform:
There are tons of new features (here is a very good article from Artstechnica); in brief:
- 28 lanes of PCIE 5.0
- DDR5
- Up to four 10Gbps USB 3.2 Gen 2
- Integrated iGPU based on RDNA2 for the CPUs gen 7000
- New socket AM5 supported till at least 2025 and a new set of chipset
I have found everything I needed and more to meet my requirements. I considered Intel, but the platform based on LGA1700 is supposedly reaching its end of life. On the other hand, AMD has proven in recent years that it can support its platform for years.
Another interesting point I didn’t know before is that, unlike DDR4, all DDR5 chips have on-die ECC, where errors are detected and corrected before sending data to the CPU, here is explained how it is supposed to work. TL;DR: DDR5 on-die ECC is not equivalent to ECC, and still, DDR5 ECC modules if you want the full feature.
At first, I was apprehensive about the steep prices. During the platform’s launch, the market struggled with a silicon shortage, which added to the cost. However, prices have since decreased considerably and are even more affordable than the previous platform at the same stage of its lifecycle.
Linux compatibility is superb and is maturing release after release.
Motherboard Link to heading
This was the hardest part; as I mentioned before, there are 4 new chipset variants for this platform.
You can find here how they differ in depth. Still, the biggest difference is how many PCI Express 5.0 lanes you have available for expansion slot and NVMe storage and how many SuperSpeed USB ports 20GB/s and 10GB/s are supported.
Basically, it means having plenty of room for connectivity and planning for the future even because right now, even the high-end graphic cards are stuck to PCIe 4.0.
When I decided to go for a high-end chipset, I found it difficult to choose among the available motherboards in the market. On the one hand, the prices were high, and on the other hand, I was looking for something not specifically designed for extreme overclocking scenarios, such as gaming. Additionally, I was looking for a motherboard that matched the color of my case (spoiler: the coolest one). It was a challenging task.
The right balance between price, features, and design was the ASUS Prime X670E-Pro board.
This board boasts a sleek design without any gaming gimmicks. It features a top-of-the-line chipset, PCIe 5 NVMe, and an expansion slot. Additionally, it includes a Realtek 2.5Gbps Ethernet and wifi, as well as several high-speed USB ports. Additionally, it perfectly matches the white color of the case I chose (the coolest part of this build in the following sections).
CPU and Cooling system Link to heading
I wanted horsepower here, so I opted for one of the high-end processors available, specifically the 7900x, 12 cores, and 24 threads up to 5.6GHz with a default TDP of 170W, a beast, no more to add here.
Then it was time to choose the cooling system; I wanted something simple, ultra-silent, and simple to mount, so I opted for the best-in-class CPU cooler, a beast made of metal + 2 ultra-silent 140mm fans.
Power supply Link to heading
The most interesting (and unexpected) part of choosing the power supply is that I learned about the existence of an official rating system, the 80 Plus.
AI GENERATED
The 80 Plus rating is an energy efficiency rating system for power supplies. It measures the percentage of input power converted into usable output power, with higher ratings indicating higher efficiency. The rating system includes the following levels: 80 Plus, 80 Plus Bronze, 80 Plus Silver, 80 Plus Gold, 80 Plus Platinum, and 80 Plus Titanium.
So I opted out here for EVGA Supernova 650 P6, 80 Plus Platinum 650W, Fully Modular, Eco Mode; why? The answer is in the name:
- 650W Platinum: enough energy room for this use case and very efficient.
- Fully Modular: simpler and cleaner cable management.
- Eco mode: automatically powers off the fan when not needed, it means silence.
RAM and SSD Link to heading
The RAM was quite simple; once I found the existence of QVL, never heard about it.
- QVL stands for Qualified Vendor List. It applies to each motherboard and is put out by the manufacturer (Asus, MSI, etc). Basically, this is a list of hardware that the manufacturer has specifically tested and knows will work with that motherboard. This usually includes hardware like RAM, CPUs, SSDs, etc. But RAM is what’s important to this discussion.
So, I used the QVL list of the motherboard, and I opted for 2x32GB Kingston Fury sticks, not ECC, even though the system is working stable as a rock. But this is a point I want to come back to in the future.
Then it was the time for the storage; I found that no consumer SSD PCIe 5.0 drives exist at a sane price, they are moving the first steps now, and as always, the starting price is for enthusiasts.
So I chose a Samsung 980 PRO, stable and rock solid - remember to update its firmware to the latest version; lately, a big batch of devices have suffered from faulty firmware causing the SSD to die.
Case Link to heading
I kept this chapter for last to emphasize the part that convinced me to carry out this PC build.
I have always loved Scandinavian design’s minimalistic and practical approach, often using wood.
Then I saw this picture. Isn’t it stunningly beautiful? Many have dreamed about making a computer case from real wood at least once, isn’t it?
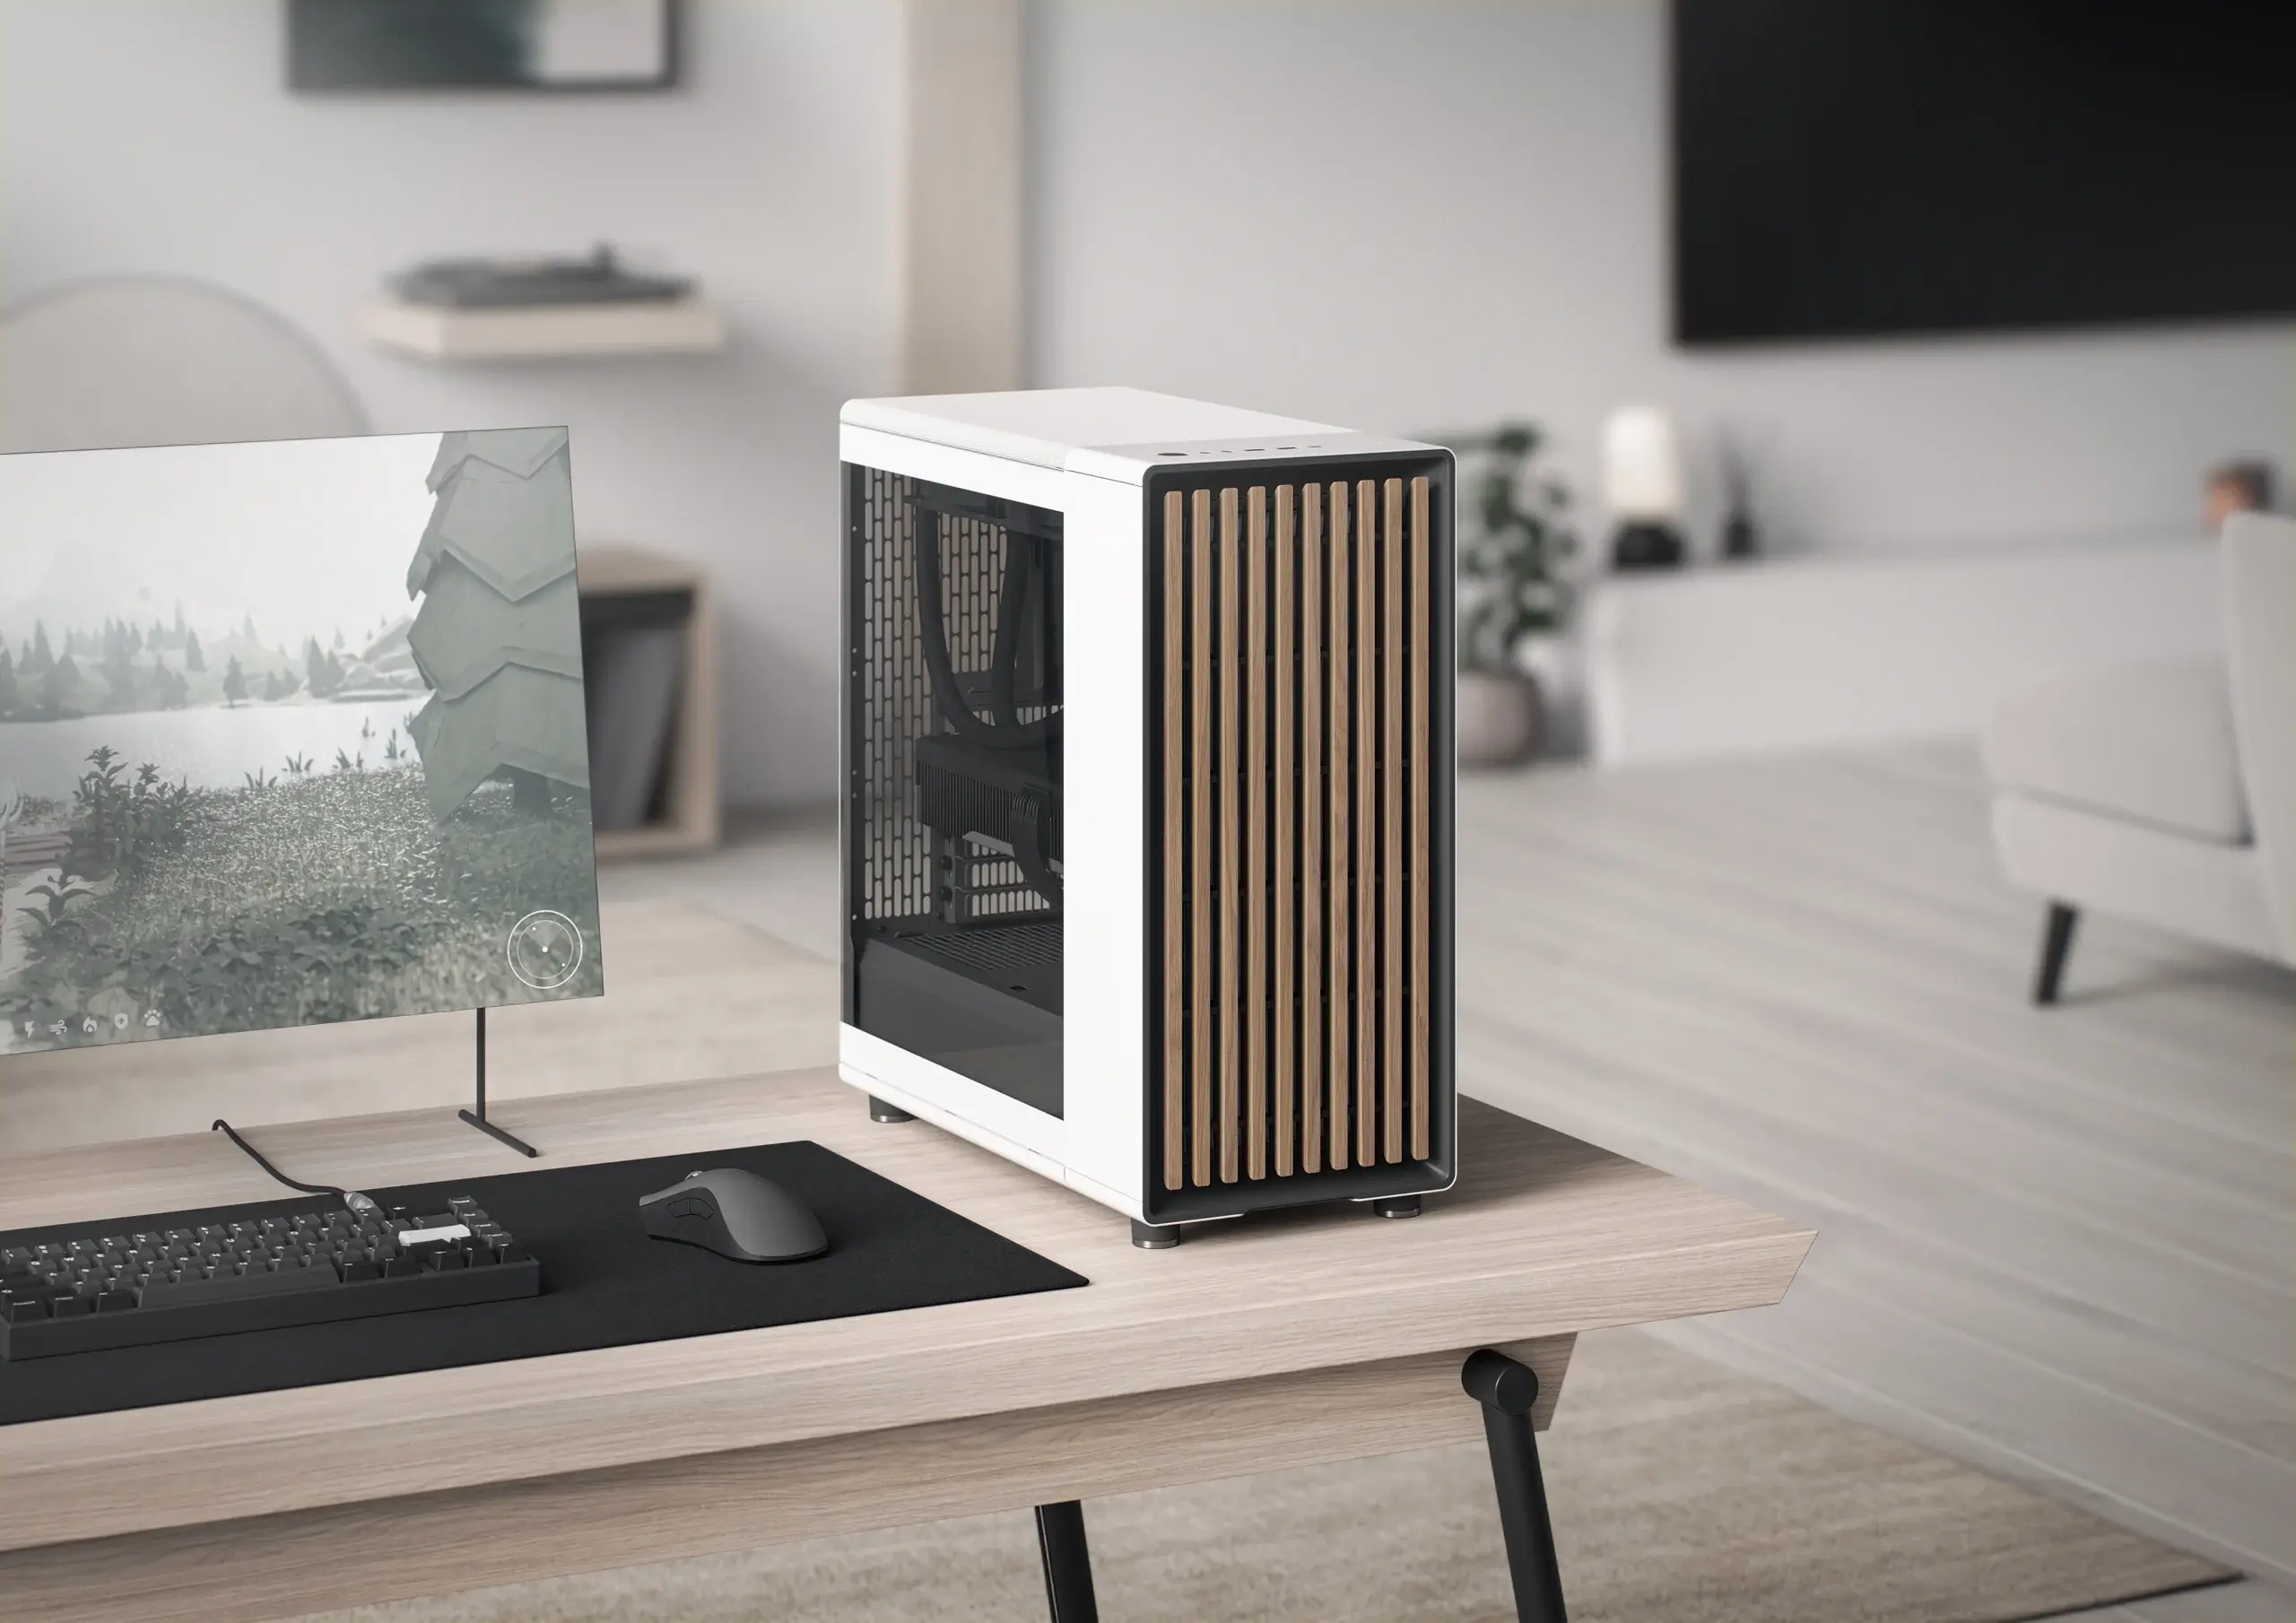
And found that was an actual recently released product from Fractal: https://www.fractal-design.com/products/cases/north/north/chalk-white/
There are 4 variants, black or white, glass or mesh side panel; I opted for the white one with the tempered glass.
I love it! It’s nice and solid, with plenty of room for drives and cables, 2 big silent fans hidden behind the wood, and a bunch of inputs (1xUSB 3.1 Gen 2 Type-C, 2xUSB 3.0, Audio & Mic) on the front interface.
Conclusion Link to heading
Final result
Building a Linux workstation from scratch is a fun and rewarding experience, but it can also be a daunting task. This guide provides a detailed overview of the hardware and software required to build the perfect Linux workstation. The requirements and specifications listed here are just a starting point, as every user’s needs and preferences will be unique.
When choosing hardware components, it’s important to consider factors such as Linux compatibility, power efficiency, and expandability. The AMD AM5 platform with Zen4 CPU architecture is a great choice for a high-performance workstation that can meet your needs both now and in the future.
In addition to the hardware, it’s important to choose software that is compatible with Linux and meets your needs.
Overall, building a Linux workstation is a fun and rewarding experience that can help you unleash your creativity and productivity. Whether you’re a developer, designer, or power user, building your own workstation can help you achieve your goals and take your work to the next level.
That’s it and i hope you’ve enjoed it!
If I am missing something big or you want to discuss it, as always, drop me a message on the contacts you can find here or drop me a message on Mastodon.